Aug 22, 2015
Aug 20, 2015
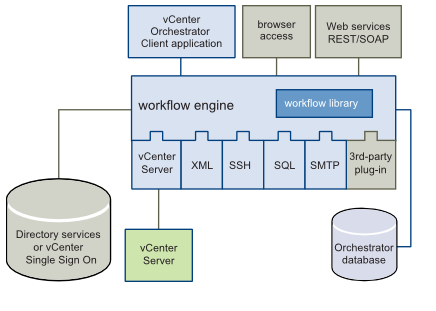
vCenter Orchestrator 5.5 Architecture
vCenter Orchestrator 5.5 Architecture
Orchestrator's workflow engine can be used to automate bulk operations and create workflow processes for integrating existing third-party tools. It can be installed as a virtual appliance, a vCenter add-on or a standalone product for a Windows Server installation.
Orchestrator's workflow engine can be used to automate bulk operations and create workflow processes for integrating existing third-party tools. It can be installed as a virtual appliance, a vCenter add-on or a standalone product for a Windows Server installation.
vCenter Orchestrator can be installed next to vCenter on a Windows
system via the vCenter installer (it will by default), or via the
vCenter Orchestrator appliance. With the vCenter Server Appliance you
don’t have vCO components, you will have to add vCO on a Windows server
or add the vCO appliance next to the VCSA. When installing on a Window
system use the vCenter server installer to install orchestrator as a
component, or do it on a complete separate system. But then prepare your
environment by installing a SQL database and starting the
vCenterOrchestrator.exe from the vCenter-Server/vCO directory on the
install media. Installing the orchestrator appliance is downloading and
deploying the OVF. When receiving an IP address the rest of the
configuration can be done via a supported web browser.
Orchestrator is composed of three distinct layers: an orchestration platform that provides the common features required for an orchestration tool, a plug-in architecture to integrate control of subsystems, and a library of workflows accessed from the client application (addon to vSphere web client). Other components are the directory services or SSO, the database, and web services for browser access and REST/SOAP API.
Deep Dive
Orchestrator is composed of three distinct layers: an orchestration platform that provides the common features required for an orchestration tool, a plug-in architecture to integrate control of subsystems, and a library of workflows accessed from the client application (addon to vSphere web client). Other components are the directory services or SSO, the database, and web services for browser access and REST/SOAP API.
Orchestrator is an open platform that can be extended with new
plug-ins and libraries, and can be integrated into larger architectures
through a SOAP or REST API. In my opinion this is the strength of
automation tools to leverage the ability to integrate in the
infrastructure architecture and not having the orchestration focus on
the primary product architecture. With the plugins architecture
automation via vCO is reaching beyond the VMware infrastructure, with
plugins for AWS, SQL, Active Directory or leveraging SOAP/REST and such.

Release / License
With the release of vSphere 5.5, vCO is at 5.5 as well (well 5.5.1 for the appliance). You can download the integrated installer or the appliance from your MyVMware vSphere 5.5 entitlements.
Orchestration is licensed from the vCenter license. vCO will run either in Player mode: allowing you to run but not edit workflows. Or in Server mode; allows you to run and edit workflows.
Player mode comes with the vCenter Essential and vCenter Foundation licenses, and server mode is leveraged with the standard and higher licenses.
Plugins
The plug-in architecture, you can automate tasks across both VMware and third-party applications.
Plugins can be developed specifically for your needs, by partners. You can find already created plug ins at VMware Solution Exchange. Just log in and search for vCO

By default, the vCO server runs a single instance in Standalone Mode, but you can set up Orchestrator in Cluster Mode to increase availability or for scalability reasons.
With Orchestrator in cluster mode, multiple active and/or inactive vCO instances with identical configuration share one external database. While the active nodes are vCO instances that run workflows and respond to client requests, the rest of the cluster nodes are inactive and in “waiting mode”. As soon as an active instance becomes unresponsive, one of the inactive instances can take over and complete the workflows that were running on the failed instance without service interruption (by using the checkpointing mechanism of the workflow in the database).
Two different modes are available in cluster mode: Active-Active or Active-Passive.

VMware vCenter Orchestrator 5.5 Overview
vCenter Orchestrator is a powerful workflow tool to automate
processes in your VMware vSphere infrastructure as well as with other
third-party technologies (eg. SQL, Active Directory,…). Although vCenter Orchestrator license is packaged with your vCenter
Server and can be used with no additional costs, a lot of people are
probably not using it. Even they do not know that it exists.
It took me a long time, too, till I installed the vCO Appliance for
the first time – but it is really a great tool, worth taking a closer
look at. For example you can build very basic workflows to automate some
every-day-tasks as eg. server provisioning, or even create extreme
complex ones, with integration of Active Directory or SQL,… .
You can install vCO on a windows server, or you go the easy way and use the virtual appliance.
- vCenter Orchestrator can run multiple parallel workflows
- Workflow engine manages and monitors concurrent executions
- Enables developers to concentrate on the tasks that the workflows perform, rather than on the workflow executions themselves
- vCenter Orchestrator performs checkpointing
- Workflow execution continues even after a hard restart of the vCenter Orchestrator service
- Allows stable processes even when the vCenter Orchestrator server crashes
- vCenter Orchestrator workflows can be interactive


Provides Graphical Development Workflow Environment (IDE)
~500 workflows and actions for vCenter Server and vCloud Director
Drag and drop actions
Conditional logic
Pause, wait until, counters
Exception handling
Version control
Role-based access control
And more
Drag and drop actions
Conditional logic
Pause, wait until, counters
Exception handling
Version control
Role-based access control
And more
Improves Workflow Design Efficiency
Workflows are built mainly by reusing existing building blocks
Workflows
Actions
Resource elements
Predefined scriptable tasks

Clustering vCenter Orchestrator 5.5 using PostgreSQL
How to reset vCenter Orchestrator’s Configuration password back to the default
vCenter Orchestrator (vCO) 5.5 - Part 1 Deploying the Virtual Appliance
Installing and Configuring vCenter Orchestrator
Aug 18, 2015
Red Hat - Cluster Suite 6 - High Availability Add-On - Architecture
The High Availability Add-On for Red Hat Enterprise Linux provides high availability of services by eliminating single points of failure. By offering failover services between nodes within a cluster, the High Availability Add-On supports high availability for up to 16 nodes. (Currently this capability is limited to a single LAN or datacenter located within one physical site.)
The High Availability Add-On also enables failover for off-the-shelf applications such as Apache, MySQL, and PostgreSQL, any of which can be coupled with resources like IP addresses and single-node file systems to form highly available services. The High Availability Add-On can also be easily extended to any user-specified application that is controlled by an init script per UNIX System V (SysV) standards.
When using the High Availability Add-On, a highly available service can fail over from one node to another with no apparent interruption to cluster clients. The High Availability Add-On also ensures absolute data integrity when one cluster node takes over control of a service from another cluster node. It achieves this by promptly evicting nodes from the cluster that are deemed to be faulty using a method called "fencing", thus preventing data corruption. The High Availability Add-On supports several types of fencing, including both power and storage area network (SAN) based fencing.
The following sections describe the various components of the High Availability Add-On in the context of this reference architecture.
Quorum
Quorum is a voting algorithm used by the cluster manager (CMAN). CMAN manages cluster quorum and cluster membership. CMAN runs as a service on all the cluster nodes. To maintain quorum, the nodes in the cluster must agree about their status among themselves.
The quorum determines which nodes in the cluster are dominant. For example, if there are three nodes in a cluster and one node loses connectivity, the other two nodes communicate with each other and determine that the third node needs to be fenced. The action of fencing ensures that the node which lost connectivity does not corrupt data.
By default each node in the cluster has one quorum vote, although this is configurable. There are two methods the nodes can communicate with each other to determine quorum. The first method quorum via network consists of a simple majority (50% of the nodes +1 extra). The second method is by adding a quorum disk. The quorum disk allows for user-specified conditions to exist which help determine which node(s) should be dominant.
This reference architecture uses network quorum - a dedicated quorum disk is not required.
Resource Group Manager
The resource group manager (rgmanager) provides failover capabilities for collections of cluster resources known as resource groups or resource trees. Rgmanager works by allowing systems administrators to define, configure, and monitor cluster services. In the event of a node failure, rgmanager relocates the clustered service to another node to restore service availability. Services can be restricted to certain nodes, such as restricting httpd to one set of nodes while mysql can be restricted to a separate set of nodes.
The following list summarizes the various processes and agents that constitute rgmanager:
- Failover Domains - An ordered subset of members to which a service may be bound
- Service Policies - rgmanager's service startup and recovery policies
- Resource Trees - Representations of resources, their attributes, parent / child and sibling relationships
- Resource Agents
rgmanager runs as a service on all the nodes in a cluster. If the service is not running, the resources are not available to be brought online. Recovery of rgmanager depends on the Distributed Lock Manager (DLM). In the event of a failure, the DLM must recover prior to rgmanager recovering services from a failed host.
Fencing
Fencing is the disconnection of a node from the cluster's shared storage. Fencing prevents the affected node from issuing I/O to shared storage, thus ensuring data integrity. The cluster infrastructure performs fencing through fenced, the fence daemon.
When CMAN determines that a node has failed, it communicates to other clusterinfrastructure components to inform them that the node has failed. The failed node is fenced when fenced is notified. Other cluster-infrastructure components determine what actions to take - that is, they perform any recovery that needs to done. For example, distributed lock manager (DLM) and Global File System version 2 (GFS2), when notified of a node failure, suspend activity until they detect that fenced has completed fencing the failed node. Upon confirmation that the failed node is fenced, DLM and GFS2 perform recovery. DLM releases locks of the failed node; GFS2 recovers the journal of the failed node.
The fencing program (fenced) determines from the cluster configuration file which fencing method to use. Two key elements in the cluster configuration file define a fencing method:
fencing agent and fencing device. The fencing program makes a call to a fencing agent specified in the cluster configuration file. The fencing agent, in turn, fences the node via a fencing device. When fencing is complete, the fencing program notifies the cluster manager.
The High Availability Add-On provides a variety of fencing methods:
- • Power fencing - A fencing method that uses a power controller to power off an inoperable node
- • Storage fencing - Includes fencing methods that disable the Fibre Channel port that connects storage to an inoperable node. SCSI-3 persistent reservations are another commonly used storage fencing method in which access to a common shared storage device can be revoked to an inoperable node.
- • Systems management fencing - Fencing methods that disable I/O or power to an inoperable node. Examples include IBM® BladeCenter, Dell® DRAC/MC, HP® ILO, IPMI, and IBM RSA II.
Useful Link:
Red Hat - Cluster Suite 5 - Architecture
Red Hat Cluster Suite (RHCS) is an integrated set of software
components that can be deployed in a variety of configurations to suit
your needs for performance, high-availability, load balancing,
scalability, file sharing, and economy.
RHCS consists of the following major components

- Cluster infrastructure — Provides fundamental functions for nodes to work together as a cluster: configuration-file management, membership management, lock management, and fencing.
- High-availability Service Management — Provides failover of services from one cluster node to another in case a node becomes inoperative.
- Cluster administration tools — Configuration and management tools for setting up, configuring, and managing a Red Hat cluster. The tools are for use with the Cluster Infrastructure components, the High-availability and Service Management components, and storage.
- Linux Virtual Server (LVS) — Routing software that provides IP-Load-balancing. LVS runs in a pair of redundant servers that distributes client requests evenly to real servers that are behind the LVS servers.
You can supplement Red Hat Cluster Suite with the following components, which are part of an optional package (and not part of Red Hat Cluster Suite):
- GFS — GFS (Global File System) or GFS2 (Global File System 2) provides a cluster file system for use with Red Hat Cluster Suite. GFS/GFS2 allows multiple nodes to share storage at a block level as if the storage were connected locally to each cluster node.
- Cluster Logical Volume Manager (CLVM) — Provides volume management of cluster storage.CCS consists of a daemon and a library. The daemon stores the XML file in memory and responds to requests from the library (or other CCS daemons) to get cluster information. There are two operating modes quorate and nonquorate. Quorate operation ensures consistency of information among nodes. Non-quorate mode connections are only allowed if forced. Updates to the CCS can only happen in quorate mode.
If no cluster. conf exists at startup, a cluster node may grab the first one it hears about by a multicast announcement.
The OpenAIS parser is a "plugin" that can be replaced at run time. The cman service that plugs into OpenAIS provides its own configuration parser, ccsd. This means I etc/ais/openais. conf is not used if cman is loaded into OpenAIS; ccsd is used for configuration, instead.
The cluster manager, an OpenAIS service, is the mechanism for configwing, controlling, querying, and calculating quorum for the cluster. The cluster manager is configured via /etc/cluster /cluster. conf (ccsd), and is responsible for the quorum disk API and functions for managing cluster quorum.
- Users frequently commented that while they found value in the GUI interfaces provided for cluster configuration, they did not routinely install X and Gtk libraries on their production servers. Conga solves this problem by providing an agent that is resident on the production servers and is managed through a web interface, but the GUI is located on a machine more suited for the task.The elements of this architecture are:


- luci is an application server which serves as a central point for managing one or more clusters, and cannot run on one of the cluster nodes. 1 uci is ideally a machine with X already loaded and with network connectivity to the cluster nodes. 1 uci maintains a database of node and user information. Once a system running ricci authenticates with a luci server, it will never have to re-authenticate unless the certificate used is revoked. There will typically be only one luci server for any and all clusters, though that doesn't have to be the case.
- ricci is an agent that is installed on all servers being managed.
- Web Client is typically a Browser, like Firefox, running on a machine in your network.

Useful Link


Aug 16, 2015
VMware - vSphere 6 - Install vCenter Server Appliance
1. Install the VMware Client Integration Plug-in
I suppose that you have your DNS infrastructure in place and you have already configured static records for your VCSA (forward and reverse). If not it’s time to do that, before the deployment starts.
The deployment of VCSA is done by mounting an ISO! Yes. Once you mount the iso, in the root directory you’ll find a html file called index.html -:).
Mount the file “VMware_VCSA-all-6.0.0-xxxx.iso” to a Windows VM.

Access the Console of the Windows 7 VM and browse to the mounted ISO image.

Open the “vcsa” directory and execute the “VMware-ClientIntegrationPlugin-6.0.0.exe” file.

In the VMware Client Integration Plug-in Installer window, select “Next”.

Accept the licence agreement and select “Next”.

Leave the “Destination Folder” as default and press “Next”.

In the “Ready to Install Plug-in” window, press “Install”.

In the “Installation complete” window, press “Finish”.

2. Install VCSA to a remote ESXi host
Access the Console of the Windows VM and browse to the mounted ISO image.

Double click on the “index.html” file.

Select “Yes” to the Internet Explorer “Active content” message.

Select “Allow” to the Client Integration Access Control message.

In the vCenter Server Appliance page, press the “Install” button.

In the “VMware vCenter Server Appliance Deployment” window, accept the EULA and press “Next”.

In the “Connect to target server” window, enter the FQDN or IP Address of the ESXi host, the root credentials and press “Next”.

Press “OK” to the Certificate Warning.

In the “Set up virtual machine” window, enter the Appliance name of the ESXi host, set the OS root credentials and press “Next”.

In the “Select deployment type” window, select “Embedded Platform Services Controller” and press “Next”.

In the “Set up Single Sign-on” window, select “Configure Single Sign-on”, enter the Password, Domain name, Site name (you now can change the default “vsphere.local”) and press “Next”.

In the “Select appliance size” window, select “Embedded Tiny, Small, Medium or Large” and press “Next”.


In the “Select datastore” window, select “destination datastore”, Enable Thin Disk Mode and press “Next”.
In the “Configure database” window, select “embedded vPostgres database” and press “Next”.

In the “Network settings” window, select the Network, IPv4/IPv6, Network type, enter the FQDN, NTP settings and press “Next”.
In the “Ready to complete” window, review the settings and press “Finish”.
The process of deploying the vCenter Server Appliance to the remote ESXi host will begin. Be patient, this takes 30 minutes or more.

In the section below, you can use the vSphere Client to monitor the install and configuration progress and assist in resolving any issues you may have.

When the message “Installation Complete” appears, click on the vSphere Web Client hyperlink and then press “Close”.


Enter the Administrator credentials defined earlier and press “Login”. Note that you may have changed the default “administrator@vsphere.local” to something different. If you want to use “Windows session authentication”, you must install the “Client Integration Plugin” (link at bottom left of screen).

The vSphere Web Client will open to the “Home” screen.
 3. Useful Link
How to manually update vCenter Server Appliance 6.0 (vCSA)
vSphere 6 - How to install and configure VMware vCenter 6 Appliance
VMware vCenter Server Appliance 6.0 Installation with External Platform Services Controller
vCenter Server Appliance 6.0 – A Fresh Install
I suppose that you have your DNS infrastructure in place and you have already configured static records for your VCSA (forward and reverse). If not it’s time to do that, before the deployment starts.
The deployment of VCSA is done by mounting an ISO! Yes. Once you mount the iso, in the root directory you’ll find a html file called index.html -:).
Mount the file “VMware_VCSA-all-6.0.0-xxxx.iso” to a Windows VM.

Access the Console of the Windows 7 VM and browse to the mounted ISO image.

Open the “vcsa” directory and execute the “VMware-ClientIntegrationPlugin-6.0.0.exe” file.

In the VMware Client Integration Plug-in Installer window, select “Next”.

Accept the licence agreement and select “Next”.

Leave the “Destination Folder” as default and press “Next”.

In the “Ready to Install Plug-in” window, press “Install”.

In the “Installation complete” window, press “Finish”.

2. Install VCSA to a remote ESXi host
Access the Console of the Windows VM and browse to the mounted ISO image.

Double click on the “index.html” file.

Select “Yes” to the Internet Explorer “Active content” message.

Select “Allow” to the Client Integration Access Control message.

In the vCenter Server Appliance page, press the “Install” button.

In the “VMware vCenter Server Appliance Deployment” window, accept the EULA and press “Next”.

In the “Connect to target server” window, enter the FQDN or IP Address of the ESXi host, the root credentials and press “Next”.

Press “OK” to the Certificate Warning.

In the “Set up virtual machine” window, enter the Appliance name of the ESXi host, set the OS root credentials and press “Next”.

In the “Select deployment type” window, select “Embedded Platform Services Controller” and press “Next”.

In the “Set up Single Sign-on” window, select “Configure Single Sign-on”, enter the Password, Domain name, Site name (you now can change the default “vsphere.local”) and press “Next”.

In the “Select appliance size” window, select “Embedded Tiny, Small, Medium or Large” and press “Next”.


In the “Select datastore” window, select “destination datastore”, Enable Thin Disk Mode and press “Next”.
In the “Configure database” window, select “embedded vPostgres database” and press “Next”.

In the “Network settings” window, select the Network, IPv4/IPv6, Network type, enter the FQDN, NTP settings and press “Next”.
In the “Ready to complete” window, review the settings and press “Finish”.
The process of deploying the vCenter Server Appliance to the remote ESXi host will begin. Be patient, this takes 30 minutes or more.

In the section below, you can use the vSphere Client to monitor the install and configuration progress and assist in resolving any issues you may have.

When the message “Installation Complete” appears, click on the vSphere Web Client hyperlink and then press “Close”.


Enter the Administrator credentials defined earlier and press “Login”. Note that you may have changed the default “administrator@vsphere.local” to something different. If you want to use “Windows session authentication”, you must install the “Client Integration Plugin” (link at bottom left of screen).

The vSphere Web Client will open to the “Home” screen.

How to manually update vCenter Server Appliance 6.0 (vCSA)
vSphere 6 - How to install and configure VMware vCenter 6 Appliance
VMware vCenter Server Appliance 6.0 Installation with External Platform Services Controller
vCenter Server Appliance 6.0 – A Fresh Install
Subscribe to:
Posts (Atom)